Downloads
DWR Diagnostics, based at DWR Veterinary Specialists, is a well-established laboratory providing a comprehensive range of diagnostic testing
Bone marrow aspirates allow for detailed assessment of cell morphology and so can identify relatively subtle changes such as dysplastic features, disordered or arrested development of an individual cell line and allow for detailed evaluation of a leukaemic infiltrate. However it is difficult to assess marrow cellularity or for the presence of fibrosis with aspiration and these are better assessed with a core biopsy. Since the aspirate and core give different information the two samples are often taken at the same time.
Depending on the site of aspiration, the bone marrow aspiration and core biopsy can be performed under general anaesthesia or with sedation and local anaesthesia. The proximal humerus is generally the preferred site although general anaesthesia will be required for appropriate positioning of the patient and because the procedure is painful. Where there is a contraindication for general anaesthesia, the iliac crest can be used with a combination of sedation analgesia and local anaesthesia. The trachanteric fossa and tibial crest are other possible sites.
A high quality bone marrow needle with stylet is required. The main choice is between locked stylet (Jamshidi type) where the stylet cannot be pushed back during insertion and the non locking stylet (Klima and Rosenthal needles) where care has to be taken to keep the stylet in position during insertion. The Jamshidi can be used to obtain both aspirates and core samples, whilst the Klima is only used for aspirates. Do not attempt to perform this procedure a spinal needle. The size of needle should be appropriate to the patient and the site being aspirated.
| Animal size | Suggested Jamshidi Needle |
|---|---|
| Cats / Dogs <5kg | 16 – 18 gauge |
| Dogs 5-15kg | 15 – 16 gauge |
| Dogs 15-30kg | 13 – 15 gauge |
| Dogs 30-50kg | 11 – 13 gauge |
| Dogs >50kg | 8 gauge |
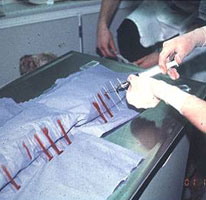
Other required equipment includes microscope slides, a scalpel blade, lignocaine, sterile gloves and drape, a 20 ml syringe and sterile anticoagulant. CPDA collected from a blood transfusion bag is preferable, although a solution of EDTA prepared from a blood collection tube is adequate. EDTA solution is prepared by filling an EDTA tube with the appropriate amount of sterile saline. Ten or so microscope slides are placed leaning on a near vertical slope, eg against a sandbag. Further slides are required for making smears and are positioned nearby.
Procedure for sampling from the greater tubercle of the humerus.
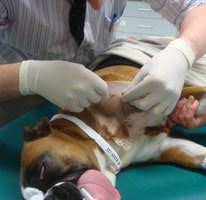
- The patient is anaesthetised and be placed in lateral recumbency. This should be right lateral recumbency for a right handed operator and left lateral recumbency for a left handed operator
- The area over the shoulder joint is clipped and surgically prepared
- An assistant flexes both elbow and shoulder joints and rotates the elbow inward towards the body wall, such that the shoulder joint is turned outward. The spine of the scapular and the acromium process at its distal end are palpated. The next bony prominence distal to this is the greater tubercle of the humerus which is the site of the aspirate
- Local anaesthetic e.g. 2% lidocaine is instilled (0.25ml in cats and up to 1-2ml in dogs) into the area, firstly into the subcutaneous tissues using a 23 gauage needle. The needle is advanced down to the surface of the greater tubercle and lignocaine is injected into the periosteum by applying pressure on the needle/syringe
- A small skin incision is made using a scalpel blade over the distal end of the greater tubercle
- The Jamshidi needle is primed with the anticoagulant solution. The stylet is withdrawn from the needle and with the 20ml syringe anticoagulant is flushed through the needle and emptied. The stylet is replaced and locked in place
- The Jamshidi needle is held in the palm of the hand using a pistol grip, with the heel of the needle in the palm of the hand and the needle being supported by the index finger
- The needle is inserted into the greater tubercle parallel to the long axis of the humerus, aiming for the point of the elbow. It may be difficult to get a purchase in the bone, but with repeated twisting of the needle to and fro with firm pressure the needle tip enters the bone cortex. Now further firm pressure is applied whilst rotating the needle to and fro to advance the needle. Similarly firm counter pressure needs to be applied by an assistant to stop the animal being pushed off the table
- Once in the medullary cavity the needle should feel firmly lodged and it should not be possible to wobble the needle from side to side. Indeed the animal could be lifted off the table by raising the needle
- The stylet is removed and the 20ml syringe attached. The syringe is then firmly aspirated by pulling sharply on the plunger 2 or 3 times, applying around 15 mls of suction each time and holding the barrel of the syringe firmly. Bone marrow (thick bloody material) should appear in the syringe. Once marrow appears further aspiration should not be attempted since this could result in haemodilution
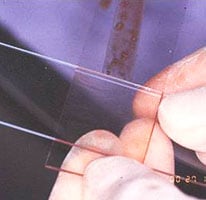
- The syringe is removed, leaving the Jamshidi needle in place and marrow is quickly transferred to glass slides before it clots
- A drop of marrow is placed at the top of each of the tilted glass slides. Blood runs down to the base of the slides, leaving marrow spiccules on the slides. Squash smears are made by placing a second slide flat over the first slide at right angles to it, (flattening spiccules) and the drawing the second slide quickly and smoothly over the first slide
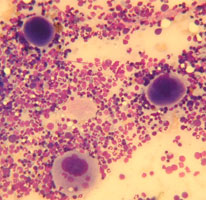
- One or two slides should be stained with a rapid dunking stain kit to ensure marrow spiccules have been harvested. Spiccules appears as densly stained blue areas, but it is preferable to check under the microscope that the samples are of diagnostic quality and not excessively haemodiluted
- A core biopsy sample can then be obtained by advancing the needle a further 2-3cm down the humeral shaft without the stylet in place. Once advanced, the needle is moved sideways quickly in different directions or rotated repeatedly in the same direction, to ensure the core is sectioned at its base
- The needle is then withdrawn. The core is pushed out of the needle by placing a blunt probe in the needle tip end and pushing the core sample out of the handle end
- Impression smears can be made by rolling the core down a glass slide, before placing it in formalin for histopathological analysis
- A sterile dressing is placed and opioid analgesia given for 4-6 hours post procedure.
If attempts at marrow aspiration are unsuccessful this may be the result of poor technique or may be as a result of myelofibrosis or myelopthesis. Aspiration can be attempted at another site such as the other greater tubercle or iliac crest. If repeated aspirates are unsuccessful a core biopsy should be taken. An impression smear of the core can be made by rolling the core onto a glass slide. Lysine coated slides may harvest more cells than standard cells.